Protected: Unifying Conversational Interfaces at IBM
Protected: IBM Community Radio
Protected: Carbon Chatbot Design Kit: Aligning IBM’s Chatbots
Chatbot Experiments

An ongoing list of experiments around conversational and chatbot UI design.
Motion Studies with Framer Motion
One of the most challenging parts of chatbots is making all components come together smoothly through motion, without elements abruptly appearing on the screen. This is one exploration of a playful thinking animation that uses the animationEnd and animationIteration events to ensure that when the bot is thinking, the chatbot marker animation is never abruptly stopped and smoothly transitions to the default state when the message is ready to be displayed.
Real Time Learning with Bots
What if bots could learn to understand new variations of an intent automatically? What if companies could deploy bots that learn new expressions of intents in real time, rather than waiting for humans to consume analytics and retrain based on misclassified input?
In this demo, I thought about what it might look like for a bot to train itself in real time on new kinds of user inputs.
If a bot is unsure how to classify a user’s input (low confidence score), it could then ask if the user was talking about any of the topics it has been trained on. If a user selects one of those topics, the bot might retrain itself to understand similar inputs in the future.
I imagine that in production, the bot wouldn’t automatically retrain on a single user’s input, but there might be a certain number of users all expressing an intent in a certain way, which triggers a bot to retrain itself (rather than waiting for the manual addition of these new variations to an intent).
Auto-Save Interaction with Debouncing in Framer
An experiment with desktop prototyping, text inputs, and debouncing in Framer.js
Often the process of creating a Google Doc, looks like this for a lot of folks (a process that I do quite a bit in the spur of the moment):
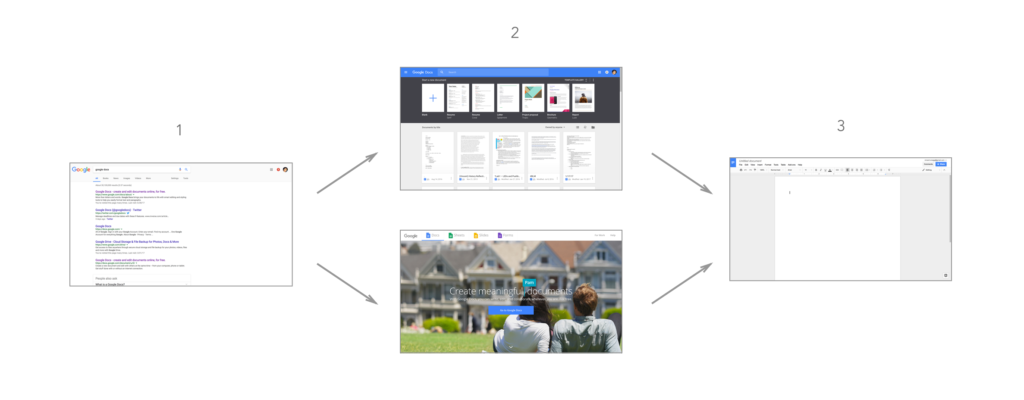
One too many steps are utilized to start authoring a document. Authoring a document takes place in a different browser tab than the the content you may be interested in.
They might run a quick search to enter the Google Docs interface, access a landing page, and only then are they able to create a new document. In order to remedy this, users (like myself) will also create shortcuts or use Chrome extensions, that open a new document. Yet these always opened in another tab, removing me from my original context.
In response, I started thinking about better ways to author documents quickly. Wouldn’t it be great if you could outline a document quickly, or jot down thoughts for later, with access to any content across all of your browser tabs?
I used this as an opportunity to explore text inputs in Framer, as well as how to achieve the “autosaving” effect with a trick I’m using more and more in my prototypes — debouncing. To achieve this simple effect this is all I’m doing in CoffeeScript:
document.addEventListener 'keydown', (event) ->
    # 'Shift' should not trigger the autosave (as should also the case for any key that doesn't return a visible character)
    if event.keyCode isnt 16
        save.html = "Saving..."
        saveChanges()

saveChanges = Utils.debounce 1, ->
    Utils.delay 1, ->
        save.html = "All changes saved in Drive"
Circular Menus in Framer: Prototyping the Android Wear App Menu (Part I)
This article is an introduction to coding circular layouts for designers who are interested in wearable interfaces, motion design, designing with code — and learning just enough math to get by.
I am not a programmer/developer, but anyone who knows me can testify that I love to use code to design. It simultaneously offers so many exploratory possibilities and control over the tiniest details of the resulting artifact. I’ve always been an advocate of understanding “just enough” about code to convey an idea, and this perspective has opened up myriad possibilities in my work.
When I bought my first smartwatch, I had found yet another excuse to learn “just enough” to communicate a concept. Something felt so mystifying, but so intriguing, about the moments when the software felt like it was made for the circular form factor, and this goes a long way in explaining how attached I’ve become to my watch.
While this is just one example of the way computing is becoming ubiquitous and embedded, it has exciting implications for the way designers conceptualize and prototype the software that runs on devices with different form factors.It made me think that about the ways we can encourage the feeling that our software was really meant for its hardware through the motion of its interface, but also how forms that feel so intuitive and pervasive in nature (like circles), generally feel strange and unfamiliar to design for. What knowledge (math?!) will be necessary for designers to prototype for other geometries / layouts in the future?
The Challenge
One of my favorite interactions (and one of the ways Google responded to the advent of the circular smartwatch) is the Android Wear “rounded” app menu that adapts to circular watches. Not only is it a better use of screen real estate (keeping menu items on the screen for longer), but it is also delightful addition to a previously rigid, vertical menu.
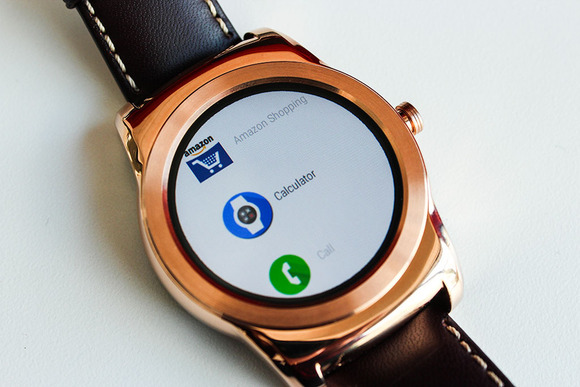
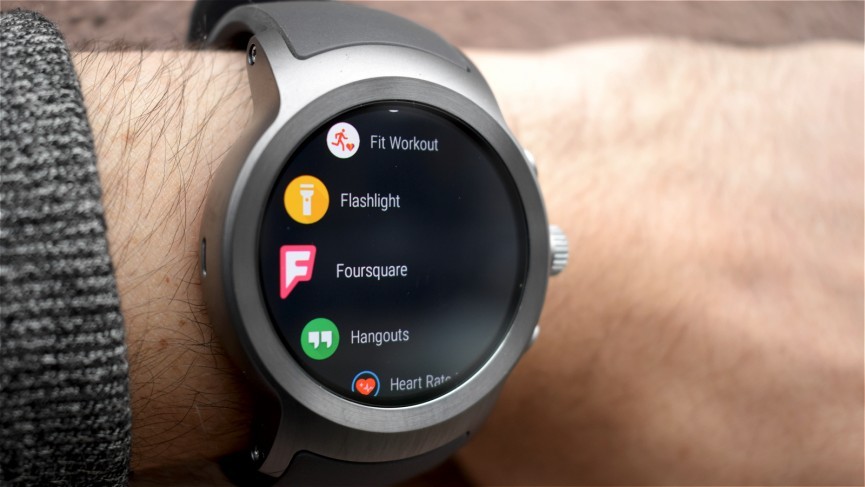
The previous Android Wear app menu on the left, and the current app menu on the right
Fascinated by its distinctive, yet natural feel, I challenged myself to become familiar with the knowledge necessary to recreate this circular menu so I can reuse these code patterns in future circular prototypes.
What tools can you use?
I love using Framer to prototype high-fidelity interactions, but in order to get up and running quickly and understand the fundamentals, I used to Codepen to sketch out the basic logic. Framer allows me to quickly import assets from Sketch and manipulate each layer as an independent object (but this can be done entirely in HTML, JavaScript and CSS). Finally, Facebook Design’s Devices brought the Framer prototype to life with realistic watch mockups.
1. Visualizing the problem
First I visualized the “apps” in the menu starting below the “watch face.” After hitting a certain threshold, they would begin a semi-circle of motion, until they hit another threshold, and left the screen.
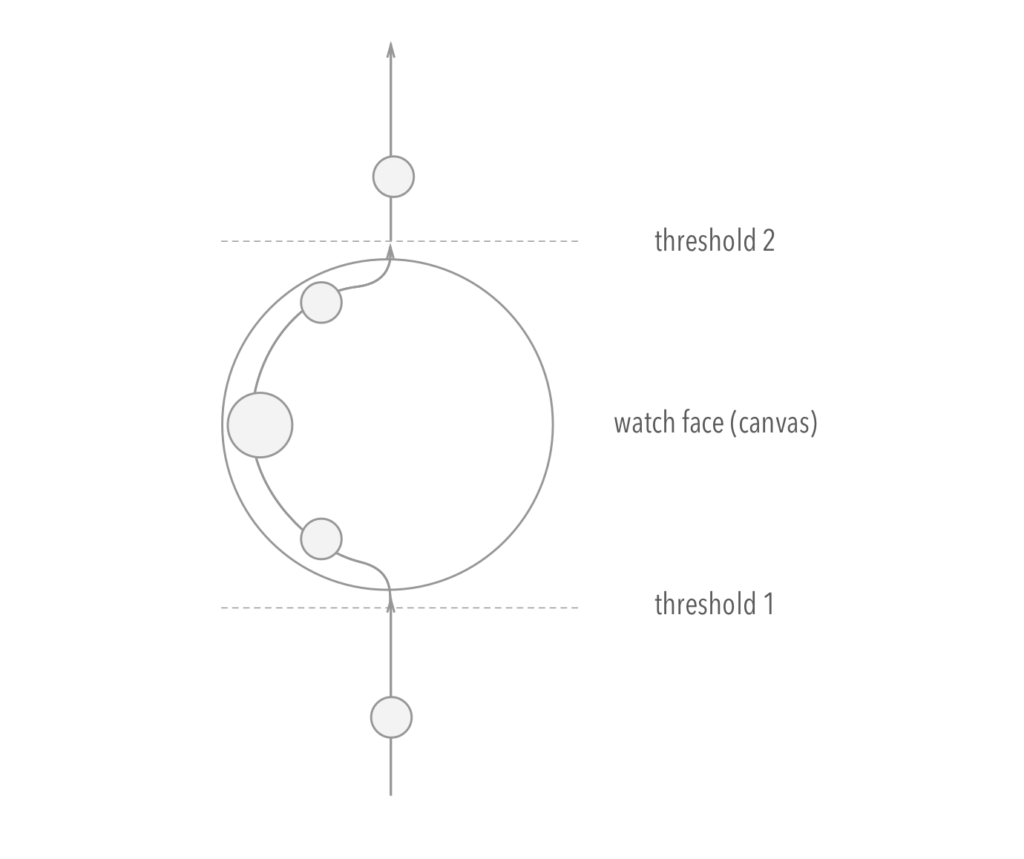
While the vertical motion on scroll seemed straightforward, determining how the objects would change direction, follow a semi-circle, and then continue on their path seemed challenging. Also, this would also need to be true for the opposite direction!
2. Understanding circles
The good news is that circular motion is actually not all that difficult! First things first, definitely check out Christian Heilmann’s wonderful article about the Math of JavaScript Animations for a simple and straightforward introduction to circular motion. He does a fantastic job of explaining how, with just a few fundamentals, you can make some powerful, eye-catching arrangements in JavaScript.
As Heilmann explains, based on the laws of sines and cosines, we should be able to calculate the coordinates of points along a circle, if we know the radius.
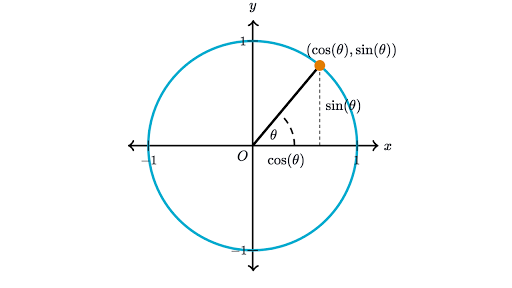
By virtue of the magic of the Pythagorean theorem, every point on this circle can be expressed in terms of sine and cosine.
In JavaScript terms, all points can be expressed in terms of a sine and cosine like this:
x = radius * Math.cos(angle) + constant
y = radius * Math.sin(angle) + constant
Then, given a set of points, we can position them equally along a circle by dividing 2*Math.PI by the amount of points in our set to get the angle at which they will all be spaced. Then, for each point, we increment by that angle to place the next point:
var points = 10;
    increase = Math.PI * 2 / points,
    angle = 0,
    x = 0,
    y = 0;

for( var i = 0; i < points; i++ ) {
  var point = new Point;
  point.setDimensions( 40, 40 );
  x = 100 * Math.cos( angle ) + 200;
  y = 100 * Math.sin( angle ) + 200;
  point.position( x, y );
  angle += increase;
}
3. Set up scrolling / track vertical position
In Heilmann’s case, we knew the angle, and were trying to find the x and y coordinates of a variable. But in the case of scrolling elements up and down a menu, we know the y values, but not the necessary angle. In a way, it is determined by whatever scroll position (y value) the object has. Therefore, we need to figure out a way to calculate the x values based on the y value. Or, more specifically, calculate the x value from an angle that corresponds to the y value.
I used Heilmann’s “plot” class to map our problem in Codepen and quickly visualize my results or any problem areas. In order to emulate scrolling with precise control (and closely monitor behavior around the thresholds in the graphic above), I used a HTML range input with an arbitrary range of 0-1000 that maps to the vertical position of my dot. I set the vertical position of the dot to be 1000 minus the range input value (so it starts at the bottom, but you don’t have to do it this way).
4. Calculating the angle dynamically within a range
Now comes the fun part! Then I checked to see if the dot was within an (arbitrary) 300 pixel threshold (from 400 – 700), in which case I used a combination of a map function to translate the scroll values (p.y) to the range of -1 to 1 (i.e., the bottom most point of the unit circle, to the top most point of the unit circle). I then use arcsine or Math.asine(), to translate that -1 to 1 sine value to its value in radians (-π/2 or -90° degrees, to π/2 or 90°). Feel free to play around with other trigonometric functions to see the different results you can achieve — some will have a similar effect. Finally the cosine of that angle (scaled by the radius) becomes the point’s eventual x position:
if (p.y > 400 && p.y < 700 ) {
      x =  -150 * Math.cos( p.y.map(400, 700, Math.asin(-1), Math.asin(1) )) + 300;
      p.position(x, 1000 - verticalPos);
}
5. Final Result
To flip the curve, simply multiply by -1 (this will show the menu on the left side of the screen, like the Android Wear menu). Be sure to adjust the radius, constant, and arcsine values to your liking, especially around the threshold values! View the full Codepen below to see the final result, as well as how I implemented a simple grow and shrink effect with the same map function logic we just used to determine the horizontal position along the circle.
6. Wrapping up
While this doesn’t look like much, we’ve done two very important things that will enable us to make future prototypes based on circular motion come to life.
- We’ve delineated the thresholds on our conceptual model with a range of our choosing.
- We’ve mapped this (vertical position) range to the domain of -1 to 1, or the y (sine) position along the unit circle. This allows us to grab the corresponding x (cosine) value that we can use to determine the dot’s horizontal position.
In fact, these two concepts are a fantastic foundation to get our app icons scrolling in a circular manner. In Part II (coming soon!), we’ll move into Framer Studio to see how these exact same concepts are used to bring the prototype to life.